
This appendix contains information that allows you to make a custom Jasper role work as per the defined logic.
Jasper Roles Overview
The JasperReports Server comes with the following roles: Role_superuser, Role_administrator, Role_poweruser, Role_author and Role_user. These roles can be assigned to your users to provide access to various available features in the JasperReports Server. You can assign these pre-configured Jasper roles to RiskVision roles. You may also create custom Jasper roles in the JasperReports Server and assign them to RiskVision roles.
Note: This technical document assumes that you are familiar with the information about creating a custom role in the JasperReports Server and assigning a Jasper role to an role in the RiskVision application. For more information, please refer to the section, Assigning JasperReports Server Role.
File Settings for a Custom Jasper Role
These are the files in which the settings are required:
actionmodel-navigation.xmlapplicationContext-rest-services.xml
The following scenario illustrates how to modify the file settings.
Scenario: A custom Jasper role allows a user to create an ad hoc view and a report in the JasperReports Server. Here, the Jasper role is referred as ‘CustomJasperRole.’
To make a custom Jasper role function in accordance with your requirements, please follow the steps given below:
- On the JasperReports Server host, go to the
%JASPERREPORTS_HOME\ReportServer\apache-tomcat\ webapps\jasperserver-pro\WEB-INF, open the actionmodel-navigation.xml file using a text editor. - Locate the
<main_create_mutton>context element and add the custom Jasper role to the appropriate lines of code depending on the custom Jasper role functionality. For this scenario, add the custom Jasper role to the testArgs attribute within the<main_create_mutton>context element. And then, add the custom Jasper role to the testArgs attribute within the<condition>element that is beneath the other <condition> element in which the value of testArgs attribute is AHD. The following graphic demonstrates the code changes.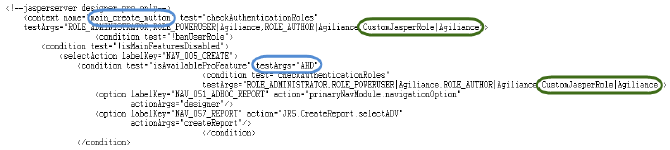
- Locate the
<com.-jaspersoft.jasperserver.jaxrs.poc.hypermedia.workflow.service.WorkflowsSecurityFilter>bean element within the<workflowsAfterInvocationManager>bean element and add the custom Jasper role to the appropriate lines of code depending on the custom Jasper role functionality. For this scenario,add the following code beneath the<util:list>element within the<property>element of other<property>element in which the value attribute is SEE_ADHOCS_ALLOWED. The following graphic demonstrates the code changes:
- Restart the Jasper Tomcat service.

 The following graphic demonstrates the code changes:

