
Teams are named groups of system users. Users with sufficient permissions can add and remove members to and from a team. The last member of a team can only be removed if the team is unassigned; that is, if the team is not a stakeholder in a workflow or an owner of an assessment, entity, and so on.
Teams can be synchronized with LDAP groups. For more information, see Mapping External User Attributes.
Note: To manage teams and their members, you must have Team View and Team Manage permissions.
To add members to a team:
- Open the Administration application.
- Go to Users > Teams.
- Select a team and click Details.
- Click Add Team Members to open the Team Setup wizard.
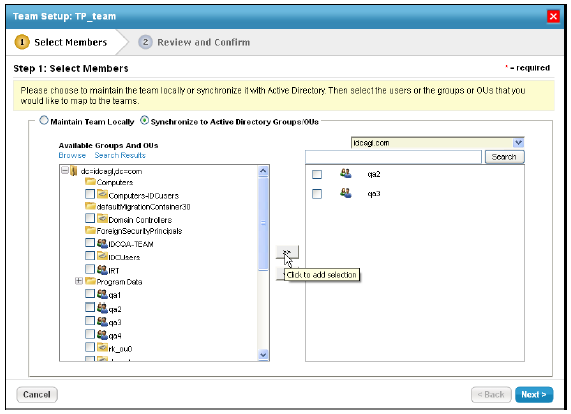 The Team Setup wizard.
 - Select team members using one of the following methods:
- Choose Maintain Team Locally.
- Select a role from the User Role dropdown list, or enter the search text in the User Name text box, then click Search for users.
- Select the users you want to add. To select multiple users, use CTRL or SHIFT on your keyboard.
- Click Next to continue.
- Choose Synchronize to Active Directory Groups/OUs to add external team members if you have configured an LDAP server.
- Select a domain from the drop-down list.
- Select a group or organization unit (OU). To find and select a particular group or OU, enter the search text and then click Search.
- Click the right arrow to make the selection.
- Click Next to continue.
- Choose Maintain Team Locally.
- Click the number of users hyperlink to see the members of a group or organization unit (OU) mapped using an LDAP directory.
- Click Finish to exit the wizard.

To remove members:
- Open the Administration application.
- Go to Users > Teams.
- Select a team and click Details.
- Check the box next to the members you want to remove and click Remove.
- Click OK.

