
You can create a new question on the fly while creating a questionnaire, or after a questionnaire is created. In both scenarios, you must first ensure that controls are present in the questionnaire. Creating a new question requires you to have Control View and Control Author permissions.
To create a new question:
- Open RiskVision Enterprise Risk Manager.
- Open the New Question wizard using one of the following options:
- Go to Risks > Controls and Questionnaires. Expand the Organization Content group under the Controls & Questionnaires group, then click the Questionnaires group to open. Select a questionnaire or content pack to open its details, click a control, and then click New Question.
On the Questions tab of the New Questionnaire wizard, select a control and click New Question.
Enter a name and text for the question. Optionally, enter the description, weight, reference numbers, help text, and assessment procedures.

Click Next to continue.
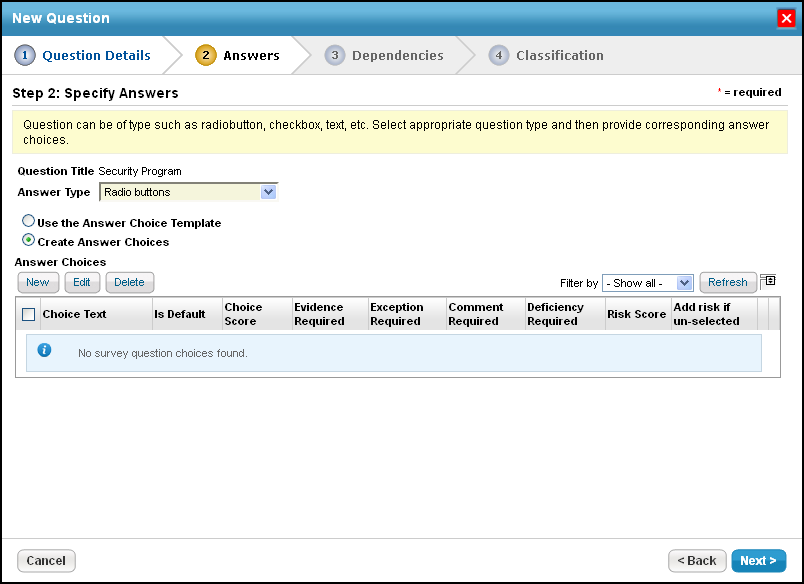
The Answers wizard page appears. Select the type of answer that you want to make available for stakeholders to answer the question. You can select radio button, text box, check box, table, time series and date.
Answer Type: TableWhen theWhen Answer Type is selected as Radio buttons, Check boxes or Table.
The wizard prompts you to select the Use the Answer Choice Templateor Create Answer Choiceoption.
If the Use the Answer Choice Template option is selected, a drop-down list containing default templates appear. Select one of the template to see the answer choices. If you want to create a new template, perform the following steps:
Click + next to the drop-down list to prompt the New Choice Template dialog.
Enter a title and description for the new template. Under the Answer Choices section, click New to prompt the New Answer Choice dialog and enter the details as described in step II (a). Click OK in the New Choice Template dialog and ensure that the new template is selected in the drop-down list.
If the Create Answer Choicesoption is selected, perform the following steps:
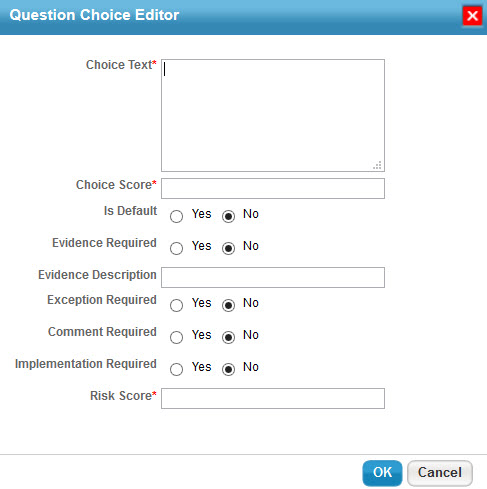
- Click New to bring on the Question Choice Editor dialog and enter the details as follows:
- Choice Text. Enter choice text for the question. For example, enter "Yes' as one of answers the question.
- Choice Score. Enter a positive numeric value between 0 and 10.
- Is Default. Select to show the default answer choice.
- Evidence Required. Select 'Yes' if you want the stakeholders to attach evidence for the answer choice.
- Evidence Description. Enter description for the evidence.
- Exception Required. Select 'Yes' if you want the stakeholders to create an exception for the answer choice.
- Comment Required. Select 'Yes' if you want the stakeholders to add a comment for the answer choice.
- Implementation Required. Select 'Yes' if you want stakeholders to enter deficiency for the answer choice.
- Risk Score. Enter a positive numeric value between 0 and 10.
Click OK to add the answer choice.
- Click New to bring on the Question Choice Editor dialog and enter the details as follows:


Answer Type is selected as Table, the questionnaire is in the tabular format. In the Table Configure section, users can configure the table format.
Click the Add Columns icon and Add Row icon, under the Table Configure section to add the required number of columns and rows required in designing the tabular format questionnaire. Enter the required Column Name and Row Name to be displayed on the table when answering the questionnaire.
When answer type is selected as the Text box.
The wizard will not require you to add answer choices.
When answer type is selected as Time Series.
The wizard will require you to select the Collection Frequency Formats, and units of metric.
When answer type is selected as Date.
The wizard will not require you to add answer choices.
After the answer choices are added, the choices appear in the Answer Choices section. The answer choices appear in the Questionnaire window the order they appear in the Answer Choices section. To change the order, click the upward or downward arrow in the answer choice row.

Click Next to continue.
Renaming choice text will not clear the answer choices of a question in target questionnaires. If you have to rename the choice text, delete the choice text you would like to change first, and then create new choice text to replace the deleted choice text.
The Dependencies wizard page appears. This step is optional. You can add dependent questions only for Radio buttons and Checkboxes answer type. Use the answer choices you created in the Answers wizard page to further prompt stakeholders to answer more questions or add questions so that questions are answered automatically if a particular answer choice is selected.
To add questions to be prompted or to be answered automatically, click Add or Remove Questions to open the Must Answer Questions dialog. Select questions in the Available Questions box and click the arrow pointing towards the right to move questions to the Selected Questions box. Then click OK.
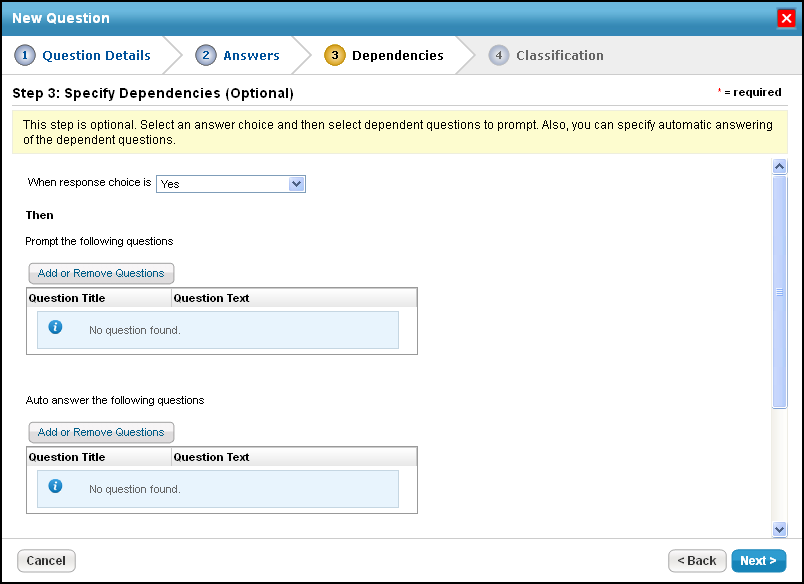
Click Next to continue.


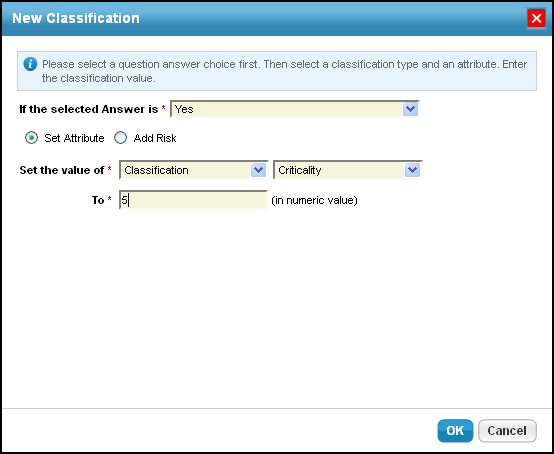
The Classification wizard page appears. This step is optional.
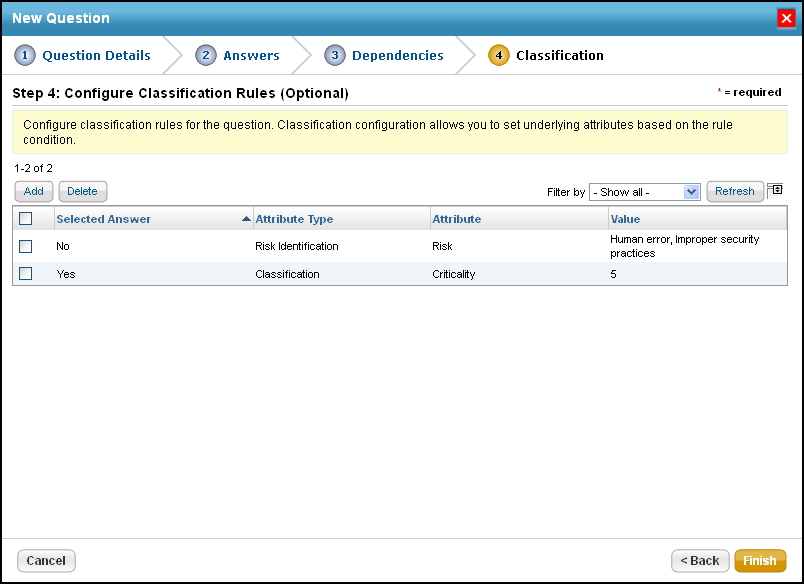
You can configure a classification rule only when answer type is Radio buttons, Textbox, Table, or Checkboxes. Click Add to bring on the New Classification dialog box. Select the answer choice in the If the selected Answer is a drop-down list and select Set Attribute or Add Risk.
If the Set Attribute option is selected, select the attribute and its value in the respective drop-down lists, and enter a value in the To field.
If the Add Risk option is selected, click Add Risk to bring on the Select one or more Risks dialog. Expand the Risks folder, select risks, and click OK.
Click Finish to add questions to the control and to exit the wizard. Clicking Finish will prompt a confirmation box, asking whether you want to add another question. Click Yes to add more questions or No to exit the confirmation box.


