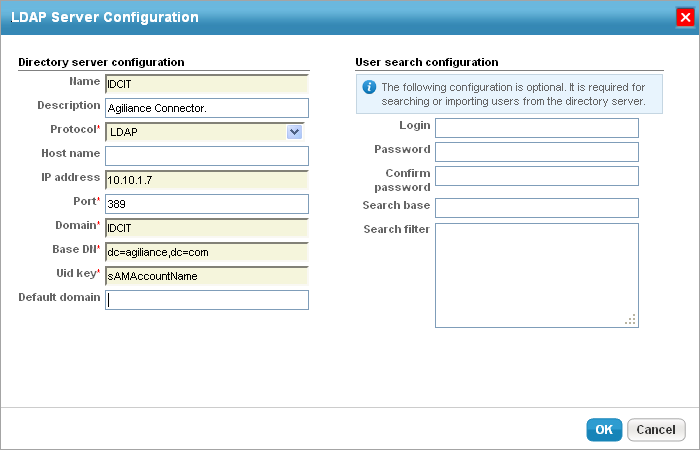
In addition to using the built-in application authentication mechanism, you can configure a local LDAP directory service for authentication. When using LDAP, the Console prompts users to enter their credentials. Once the user is authenticated by LDAP (that is, the credentials are validated by the underlying LDAP directory service), RiskVision retrieves the corresponding user's attributes and permissions based on the mapping roles stored in the database. RiskVision can map the User ID, first name, last name, email, and LDAP group from the Identify Provider.
In multi-tenant deployments, only the SysAdmin user can configure the Authentication Server. The Administrator or the SysAdmin user can manage the Authentication Server in a single-tenant deployment.

Using LDAP authentication with RiskVision requires:
- A supported LDAP Directory service, such as Active Directory (AD) or Sun Directory Server.
- Creating and configuring an LDAP Server.
- Optionally, if LDAP users will be imported into the RiskVision database, login names defined for LDAP users that you want to grant access to the RiskVision solution.
Resolver Support and Professional Services can assist you in exploring options and setting up LDAP authentication when installing the RiskVision Server at your site. You can configure the attributes for each LDAP Server to provide a separate user role. For more information, see "Configuring Attribute Mappings" and "Configuring External User Authorization" in the RiskVision Administrators Guide.
To set up an LDAP or Active Directory service connection:
Log in as sysadmin or administrator.
In multi-tenant deployments, only the 'sysadmin' user in the system tenant space can configure the authentication connector. - Open the Administration application.
- Go to Administration > External Authentication to open the LDAP Servers page.

Click the default Authentication Connector. You can also create a new LDAP service by clicking New to open the LDAP Server Configuration dialog.

Enter the following configuration information:
- Name: Enter the LDAP name.
- Description: Explain the purpose for setting up an LDAP.
- Protocol: Select the connection type (such as LDAP or Secure LDAP), if requested.
- Host name: Enter the host name or the IP address.
- IP address: Enter the IP address.
- Port: Enter the connection port. The default ports are 389 (LDAP) and 636 (Secure LDAP).
- Domain: Specify the domain name. Display the domain name for users to select while logging in to RiskVision.
- Base DN: Enter the base distinguished name such as
dc=,dc=com. - Uid key: Enter the name of the field that specifies the unique user identifier, For example, uid for standard LDAPs or sAMAccountName for the AD.
- Default domain (If you have multiple domains).
Enter the connection and search details:
- Login: This field is optional. Enter the account information that the application must use to authenticate users against the LDAP service. The account requires at least read access to the DN and search base.
- Password: Optional. Enter the account password.
- Confirm password: Re-enter the password.
- Search base: Use for large directories to prevent timeouts, this field is combined with the base DN; for example, enter OU=Security
- Search filter: Limit the scope of the search to certain objects, for example, to search the only user in the AD, enter ObjectClass=User.
- Click OK.
- Enter the credentials for a user in the LDAP other than the LDAP account and click Test.


